Showing posts with label Hobby. Show all posts

2.20.2014

Flesh Tearers - The Tutorial

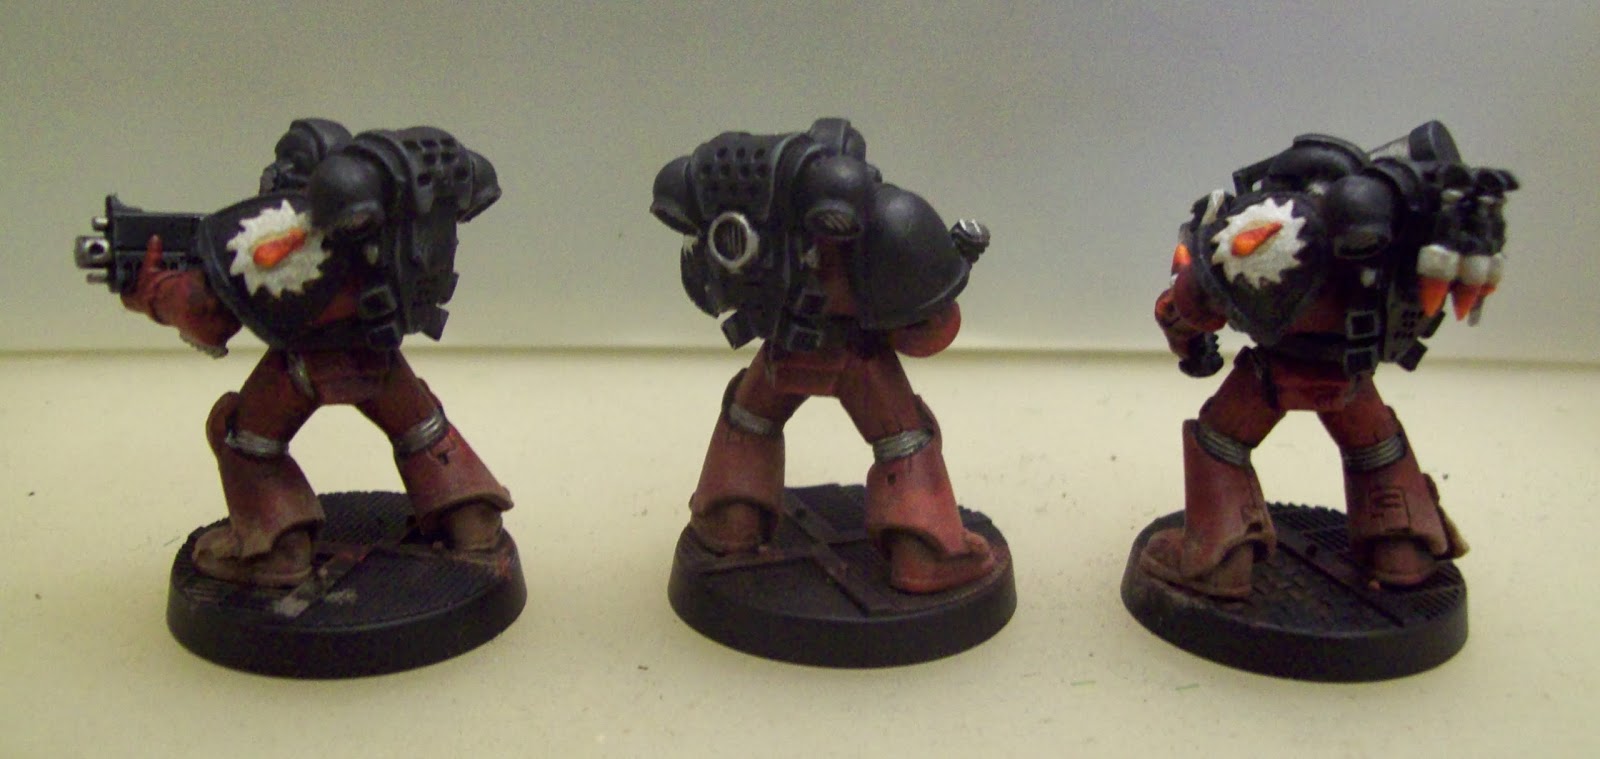
 As promised before, here is the long awaited "How to Paint Flesh Tearers the Ricalopian Way" (sorry for the wait).  Most of the colours are done with three tones (coats of paint and/or washes), this is my table top quality.  Each picture has the three stages, left to right, starting off with the dark red armour.  Basecoat with Sanguine Base (P3), apply a heavy midtone of Red Gore (GW, although Wazdakka also works), then give the recesses a wash of Agrax Earthshade (GW).  Feel free to be messy with the first colour, everything else will get painted over soon.
 Next step is the black.  Basecoat all the black areas with Thamar Black (P3), pick out the edges with Ironhull Grey (P3) lightly, then wash the black with Nuln Oil (GW).  The black wash will tone down a lot of the grey except for the edges.
 With most of the armour done it is time to dive into the details.  The sawblade, hazard stripes and purity seals get basecoated with Rucksack Tan (P3).  The sawblade and hazard stripes are lightened with Kommando Khaki (GW) then highlighted heavily with Morrow White (P3).  The purity seals are washes with Riekland Fleshshade and highlighted with 'Jack Bone (P3).
 Bright red is next.  Start with Red Gore (GW) on all the blood drops.  Highlight the bottom of the drops with Evil Sunz Scarlet (GW), and highlight the bottom edge and top tip with Troll Slayer (GW).
 The metallics are started with a basecoat of Ironbreaker (GW) and a lightlight of Mirthil Silver (GW).  The metal is then washed with Nuln Oil (GW).  At this point the dust can be applied to the boots, I use a very dry brush and Khemri Brown.  I test how dry the brush is on the base first to avoid any large splotches.
The gold is next, starting with Gehenna's Gold (GW).  Highlight the gold with Shining Gold (GW) and then give it a wash of Riekland Fleshshade (GW).  After the gold is done do any touch ups that are needed paying extra attention to the sawblade's teeth.
Basecoat the blue areas with Cynar Base (P3) like wax seals, power weapons, lenses, lights and wires.  Then midtone these areas (two thirds coverage) with Cygnar Highlight (P3).  Give the blue a highlight of Arcane Blue (P3) except for the wires.  On glowing areas, overbrush (pulling away from the source of the glow) with the highlight.  Use Frostbite (P3) to give the glowing areas an extra highlight, overbrush like the previous coat but use less.
Last is the base. Basecoat the base with Warplock Bronze (GW) which is similar to the old Tin Blitz (GW) but has to be shaken well before each use as it separates fast.  Pick out some hazard stripes with Fortress Grey (GW), I use a grey instead of white so that it has a faded look to it.  Give the entire base a heavy drybrush of Ironbreaker (GW), any paint that gets on the hazard stripes will give them a chipped look.  Wash the entire base with Agrax Earthshade (GW) then paint the rim Thamar Black (P3).

And that it it, finished Flesh Tearers!  I hope this will be useful to some.  Until next round, be well.

1.30.2013

GottaCon is Imminent

 The final preparations are in full swing.  All other projects have been pushed to the backburner until Monday.  The trolls are ready and the kilt fits fine.
 Painting competition entries have been chosen, an agonizing process as many of you know, and they all are complete except one...
Updated nWo books are being printed, stacked and stapled.  The adventuring party has received a magnetized tray, complete with bunny.
 And the Iron Arena is complete!  Gaze upon its virgin plain....
 The arena dominates a 4'x4' board, the stone border sits 10" in from the edge (what was kill box at the time...)
 There are rumours that Cryx uses this venue to harvest materiel, I'm not going to say they don't...
 The proper irrigation of the various fluids that are spilled here is essential.  Blood, boilerwater and other liquids are pumped underground to avoid flooding.
 Two large drains sit on either side, filled with goo and stuff.
 The whole thing was painted in the same scheme as Steamtown.  All of the walls and pipe fit in perfectly, but a dedicated table needs more,
 In addition, 14 pieces of terrain were made for modular deployment.  Two metal hills, four walls (cover), four rubble strips (concealment) and four pillars.
 The idea is that before deployment, a player rolls a d3 and adds one for every ten points the game is, this is how many pieces of terrain are placed with the standard terrain placement rules in the book.
 The pillars are for flavour and are not part of the terrain placement stuff.  If both players are cool with it, the pillars can be used by any beast or jack with an open fist.  The pillar adds +4 to melee damage and has knockback (the target gets slammed).  If the jack/beast has two open fists they can throw it; range is half the user's Str, POW 4 (plus user's Str), the pillar is then placed on its side beside the target (scatter for which side).  The pillar can be carried or dropped without spending an action, while picking one up would cost one action.
Until GottaCon...be well...

10.28.2012

A New Nightmare - WIP

 I originally picked up a Cryx helljack to make Malice from, but I got a better idea.  This left me with a spare helljack, so I decided to convert a plastic Nightmare.  Not that there is anything wrong with the stock model (I have plans for that mini) but it wasn't scary-ghost-robot enough.
 A quick dig through the bitz boxes unearthed some large dark eldar blades, talos tails, daemon horns, and the spikes from the Anima mini I made into a warwitch.  Since I envisioned him as a mini wraith engine, I did away with the legs, using the helldriver as a tail.  The dark eldar blades replaced his claws, as he has "wicked claws" with reach.
 Like most of my minis, he got a fancy base with a nice chunk of cork to stick the pin through.  With five pins total, he is a pretty stable mini.  The metal spikes are glued into holes drilled into the shoulders, instead of trying to make a hole in the spikes, which worked extremely well.
Until next round, be well.

8.15.2011

Wraith Engine and a Photo Chamber

Almost there, the wraith engine nears completion. It is a beast, with many odd angles, but so far it has been a ton of fun to paint.
All that is left are the rags (which I don't quite understand why they are there) and the base.
I also built a completely free Photo Chamber! Yay for better picture quality!
Most of the idea came from Massive Voodoo's lightbox tutorial. Thanks guys!
I grabbed a white bucket, cut a hole in the front. Put the bucket on a clear binder (with a piece of paper inside) and placed a light behind/above the whole thing.
The white bucket diffuses the light, sending it everywhere and reducing shadows, making the entire inside glow. I might pick up a second light (to place one on either side) but I think this is good for now.
Using a bucket has another bonus; storage. To put it away, the binder blocks the hole and the light fits inside, genius!
Until next round, be well.

8.11.2011

Mk I-V Hurricane Bolters

Long ago, I once assembled a set of Mk I hurricane bolters, which were metal. In addition to having a nice armour plate, they were also a pain in the @$$! With a Crusader sitting in the commission cue, there was only one option; Mk I-V.
I took the plastic bolters from the Redeemer kit, which were by far easier to glue together and would give a narrower profile to the sponsons.
The pivot/rack was trimmed down alot, and fitted so it still attached to the plate.
The axle was positioned central to the guns with enough space to rotate freely.


There is one small piece that needs trimming on the back of one of the scanners so that it can still turn all the way.

The axle was cut just after the first bump to give the guns room.
The ammo feed under the gun also needs trimming so the support sits flush.
Much easier...
Until next round, be well.

6.24.2011

sigh...

I am tired, it was a long day. Through the miserable sunlight, (I work nights, your sun is crazy bright daywalkers), I journey to GW to get primer. Just primer. It is not that I am boycotting, or irate over price hikes (cause I am), I just have a lot of projects to finish before new models. So I went in for a single can of primer.

They know the sun-time is bad for me, so the chatter is kept small, which was ok (I prefer to chat after purchase anyways, it's a hunter thing). I took a look around, briefly due to fantasy night starting up, and checked prices. Grab my primer and wait to pay

This is where things go badly. I know the upsell games, being a previous red-shirt myself, but this was something else. It was about White Dwarf, how I should get it for the pretty pictures, and feel guilty for not having it. Two staff members accosting me for my decision to trust in the Blogosphere over a 100-page advertisement.

No, I don't read White Dwarf anymore, I think it is useless now. It didn't used to be, and I have the issues to prove it. Really GW? Is your magazine selling that badly?

6.17.2011

The Horizon, It Is Epic

You might have noticed, Ricalopian posts have gotten a bit few in the last while, my batteries are getting low. My apologies, this is being remedied with a MeWeek. A hole week of relaxation and, of course, hobby. Although I have no set obligations, there are a few projects that I am leaning toward....

1[- Terrain, cause there is always more....
2[- A light-box *(does anyone know where there might be a good tutorial?)*
3[- The Angelis Project.
4[- Tony, the monster.
5[- Imperial Interceptor, which is almost done...
6[- clowns for the clown god
7[- BACON!
8[- Scratchbuild a mercenary titan (cause I'm crazy and ok with it).

Of course, loyal readers, I will keep you updated...and any comments about them projects are worth their weight in titanium ;)

Until next round...

5.09.2011

A Pleasant Day

I set about making a couple of boards wargame-ready this weekend. And the first one is finished.
I rescued two 3x4' plywood boards from a free bin. I then cut out a bunch of plasticard blobs. A grass mat was selected and cut to size, then flipped over and the blobs traced out on the back. The blob shapes were cut out of the grass mat, then it was flipped over again to trace out the blob shapes onto the board. The blobs were spray painted with a really dark green base, light brown (which ended up dark...) and then some 'make it stone' textured spray. The blob edges were then highlighted with a bleached bone-like color (dollar store kind).
The grass mats were laid down, trimmed and white-glued, then stapled. Wood edges to protect the table during storage were then nailed in. The whole project was oddly easy...

Post 200 - With Style!

A Stylish Blogger, me? Well that is what Mark at Musings of a Metal Mind thinks. To get such a nomination from a hobby icon like him, well that is just cool, thanks man! So in the spirit of this digital wildfire, here we go...

What to do:
-- Thank and link back to the person giving you the award (see above)
-- Share seven things about yourself
-- Select 10-15 blogs who you think deserve this award
-- Contact these bloggers and let them know about the award

Seven things about myself....

--I used to be a redshirt. A time ago I was a staffer at GW, it was one of the best experiences in my working life. I can blame many of my hobby skills on those two years. It is what prompted me to be a productive member of hobby society.

--I drank beers with Tom Savini. He is a horror movie artist and played Sex Machine in Dusk till Dawn. It was after the first con I volunteered for. Dax (from DS9) was at the table too. Much laughing ensued.

--I am writing a RPG. For the past few years (er....13?) me and my beta testers have been developing nWo, you can find it if you look hard enough....

--A gaming group lives in my house. Obviously, I am a gamer. And they all don't "live" in my house, but there always seems to be a game about. Rabbit Hole Games for the win!

--I like to burn things. No, not arson, spinning fire-staff. Although I like it when other things are on fire too...

--Jack T. Rabbit. He's my bunny, he is also ancient, and he's my best friend. He is a fuzzy dwarf lop and likes to help with terrain building and destroying the instructions so I don't read them. He also beats up cats.

--I don't watch TV. Ever. I go to work instead ;)

Ok, so the other part. I'm not sue if these guys have got a nomination yet, but they should;

1. The multiverse at Porky's Expanse has continually spurred me on. It is a vault of interesting ideas. It is a good read, every time.

2. Fellow artist, and brother in arms, Swimming Eagle. There is some hobby stuff in there, but it is mostly for the view. This is a blog filled with the mind of a true artist.

3. Zen 40,000. The blogger responsible for igniting my interest in marines. Not only are the models excellent, (this is the first yellow-with-checker-marine I have EVER liked), but the backgrounds he writes (for each unit!) realizes the army.

4. Luddstuff, it is like a scratch building supernova.

5. Fun Painty Time? Just take a look at what Carmen has been up to. Gangsters? Guys with pipes? A quiet street corner?

6. Sometimes I need a chaos fix. So I head over to Chaos Brushes. There are some inspiring things over there...

7. There have been some really interesting things popping up on the Eye of (t)Error lately. I love the patrol boat!!!1

8. Usually, orks aren't my thing, but the smurf's lootas are simply brilliant.

9. The Glorious Works are glorious. And stunning.

10. The Harrowed is a new blog I've only recently started following. Crazy daemon stuff, yes please!

There we go, now time to send out some messages....